
Hey all! Sorry for the long delay, but once again, I’ve been really really busy. This project is all about Arduino! What we’ll be trying to do is to take an Arduino with the LiquidCrystal library, and connect a 16×2 Hitachi HD44780 compatible LCD. After that, we’ll connect the cheap I2C Microchip TC74 temperature sensor to it, and magic will ensue. That, or temperature reading will ensue. One of them for sure!
Hardware list:
1 – AC/DC Adapter or some kind of DC PSU (not pictured)
2 – Breadboard
3 – L7805CV – Optional
4 – Our awesome Arduino! Any one of them should work with minor changes.
5 – Microchip TC74 – This can be in 5V or 3.3V. Both can use 5V or 3V at the cost of 1ºC/V accuracy. I’ll be using a 3.3V with a 5V regulator, because I’m that hardcore. Or cheap.
6 – LCD – Hitachi HD44780 compatible is advised, but it can have almost any size. I’ll be using a 16×2 LCD.
7 – Resistors – a 4.7K is advised for the I2C bus, but it can range from 1k to several hundred K. You should also check your LCD datasheet for required hardware, since some advise resistors or pots to work.
8 – 220 pF capacitors may be required for the SDA and SCL lines.
The wiring on this project is simple. To connect the LCD to the Arduino, the LiquidCrystal library provides the recommended connections. For the TC74, we just need to connect SDA and SCLK to the correct Arduino ports. From the Arduino hardware page, we can see “TWI: A4 or SDA pin and A5 or SCL pin”. Simple enough. The following image should simplify all the connections for you. If you are having trouble getting data from the TC74, for example, getting returned “-1”, put the 220 pF capacitors from the SDA and SCL to the ground.
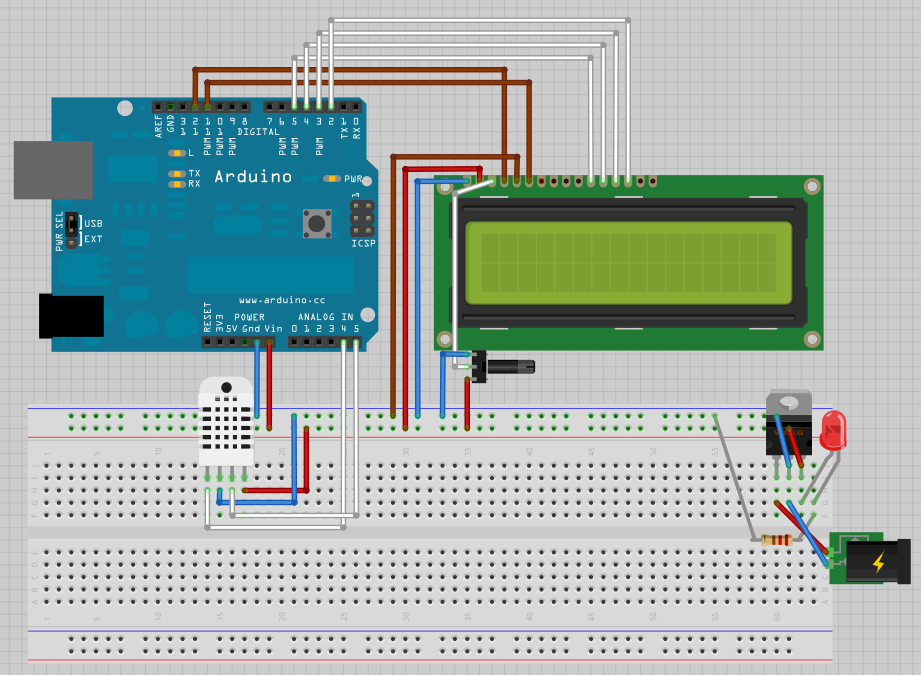
Project schematic
Useful information:
- Be aware that some LCD require more or less connections, and that the datasheet SHOULD be read before any connections are made. The pins should be the same if you are using a HD44780 LCD, though.
- Note that due to the lack of models in Fritzing, the TC74 is incorrectly represented: it should have 5 legs, with the left one not in use. Please read its datasheet before trying to connect it.
- The Vin connection should be used to power the Arduino. One could be tempted to use the 5V connection, but that is dangerous. This is quoted from the Arduino Hardware page: “Supplying voltage via the 5V or 3.3V pins bypasses the regulator, and can damage your board. We don’t advise it. “
Source code:
// Simple Arduino TC74 thermometer with LCD ##
// Visit ElectroSparrow Blog for more information ##
// http://www.gpardal.com ##

#include <LiquidCrystal.h>
#include <Wire.h>
//TC74 address. Find yours in pag 9 of the datasheet
#define address 0x9A

// initialize the library with the numbers of the interface pins
LiquidCrystal lcd(12, 11, 5, 4, 3, 2);
byte val = 0;

void setup() {
// join i2c bus
Wire.begin();
// set up the LCD's number of columns and rows:
lcd.begin(16, 2);
// Print a message to the LCD.
lcd.print("Temperature:");
}

void loop() {
int temperature;
// set the cursor to column 0, line 1
// (note: line 1 is the second row, since counting begins with 0):
lcd.setCursor(0, 1);
// Set TC74 for read
Wire.beginTransmission(address);
Wire.write(val);
Wire.endTransmission();
// Read from TC74
Wire.requestFrom(address, 1);
if(Wire.available()){
temperature=Wire.read();
lcd.print(temperature);
}
else{
lcd.print("Error!");
}

delay(5000);
}
I hope you like it, and as always, if you have any problem just comment below! See you next time!